The paddle float rescue

Every kayaker who spends any amount of time in their boat will at some point end up flipping over in their kayak. It’s just a part of the sport really. There are many ways to remedy the situation, namely getting the kayak back upright with the paddler in the kayak. Kayakers can learn to roll their kayaks, do assisted or “buddy” rolls, or wet-exit and have to make their way back into their kayak. There are rescues such as the T-Rescue where another kayaker assists in getting the flipped kayaker back into their kayak. And then there are the rescues that employ the use of a paddle float. While all of these safety techniques are important to know and practice, it is always essential that each kayaker know how to get back into his or her kayak on their own (Self Rescue). It is for this reason that the paddle float was invented.
There are two different styles of paddle floats, a rigid and an inflatable. They both preform the same function when preforming a rescue. It is paddler’s preference in which style one prefers.


After a capsize, maintain contact of both your paddle and kayak. Your kayak will be deck down. Using hand over hand technique, grip onto the deck lines and position yourself near the cockpit. Once in position, locate your paddle float (I keep mine on the front deck at all times, so I do not have to look for it when needed). Once this has been obtained, slip your leg inside the cockpit to maintain further contact and control of the kayak. Slip on the inflatable float onto a blade, secure this to the shaft, and fully inflate the chamber(s).
Right the kayak, and maintain contact. Locate the deck line behind the cockpit, slide the blade under the line – power face down. This secures the one end of the paddle to the boat. The paddle should be perpendicular to the kayak so it acts much like an outrigger.
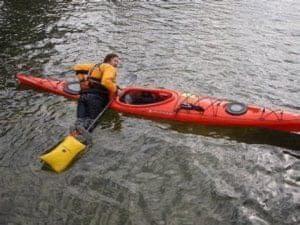
You are now ready to begin getting back into the kayak. You should be behind the kayak paddle. Depending on the side you are on, take the closest hand to the kayak cockpit and grab the kayak cockpit and the kayak paddle in that hand. Place the closest foot on the kayak paddle shaft just above the paddle float. Push with your foot on the kayak paddle and pull your chest up onto the stern of the kayak with your hand. Maintain the kayak paddle position with the paddle float on the surface of the water and the other end placing pressure on the kayak.
At this point you have pulled your body onto the kayak and have one foot on the kayak paddle, just above the kayak paddle float. You will need to get the other foot on the kayak paddle shaft because during the next step you will remove the first leg from the shaft to place it in the kayak and you’ll need the support of the other leg. Bring the other foot into the place where the first foot is on the kayak paddle shaft. Slide the first foot up to make room.
You are now ready to enter the kayak from the water by leveraging your weight on the kayak paddle float. While supporting yourself on the back deck of the kayak and on the kayak paddle blade, remove the closest leg from the kayak paddle shaft. Bring the knee toward the kayak and place your foot and leg inside of the kayak cockpit.
To get into the kayak from this position, simply place the other leg inside of the kayak. You will still be applying pressure to the kayak paddle float by the pressure you are placing on the kayak paddle shaft. In this position, the kayak paddle is acting like an outrigger with the paddle float preventing the kayak from tipping over. Once your body is in the kayak, it might feel awkward because both legs will probably be in one leg hole of the kayak cockpit. That’s ok, the main goal is to get in and to adjust your body once in the kayak. Make sure that the kayak back rest is upright and out of the way before the next step.
At this point you will probably be face down in your kayak and on the back deck. You will need to roll over and into the kayak seat. This can be tricky because there will probably still be water in the kayak which will make it “tippy.” Keeping two hands on the kayak paddle shaft begin to reposition your legs and roll over and toward from the kayak paddle float. Once half way over, remove your closest hand from the kayak shaft and bring it across your body and onto the other side of the kayak paddle, keeping pressure on it against the kayak. Once you are in the seat the kayak paddle will be behind you but you will still have a hand on both sides of the paddle. One will be keeping pressure on the paddle against the boat and one will keep pressure on the paddle float against the water.
Now, secure the spray skirt back on the combing. The paddle float is still in place and may be used for additional stability. If needed (and in calm water), the excess water may be removed from the kayak by creating a small opening on the side of the spray skirt and inserting the bilge pump. Once water has been removed, remove the paddle from the deck line behind you, deflate the paddle float and secure.
Paddle float rescues are a useful tool to incorporate when other self-rescue techniques fail. Practicing and improving your technique for any self-rescue limits your exposure to the elements, and lets one resume to the enjoyment of paddling. Like any rescues, practice in a calm body of water, perfect your technique, and then attempt variations.
For the paddler within……